Tuesday, September 11, 2012

The *BEST* Shredded Chicken recipe CROCKPOT


Shredded Chicken from Crockpot

Ingredients

3 Large Fresh (not frozen) Chicken Breasts
1 Large Can Swansons chicken broth or 4 cups of your fav homemade Chicken Stock (what I use)
2 tbsp Cumin
2 tbsp Chili Powder
1 tsp salt
1 tsp pepper

Directions

Place soup into crockpot. Add all seasoning. Stir. Add Chicken Breasts

Cook on low 4-5 hours

Remove. Using 2 forks shred chicken

Great for soft tacos, nachos. We Use leftovers for a chicken sandwhich the next day!

For Tacos: it is great with small flour tortillas! I put a taco bar out with little bowls of each of the following:
 
Sour Cream
Chopped Onion
Fresh washed and chopped Cilantro
Sliced Olives
Lettuce
Diced Tomatoes
Valentina (or other choice hot sauce)
Shredded Monterey Jack Cheese
Some flaming white cheese dip (recipe below)


Flaming White Cheese Dip


Ingredients
 
1 pound White American Cheese ( I find at the deli counter and have slice)
1 can of Sliced Jalapenos
1/2 cup of milk
1/8 cup of water
 
Directions
Place cheese, water and milk in saucepan. Turn on low to medium. Dump the liquid from small can of jalepenos into pan. Dice up 3 slices (or a few more if you want spicier) and add to pan. Keep stirring and turn down temp if needed. You dont want the bottom of dip to scald. Once melted enjoy! Great for dip or nachos!
 
Will soon post recipe for homemade pinto beans and refried beans!!


Wednesday, June 27, 2012

My Shepherd's Pie. My Husband's favorite dinner

LISA'S SHEPHERDS PIE


Ingredients:
5 Large potatoes
2 pounds hamburger
1 can of corn
8 oz. sliced sharp cheddar cheese
1/2 cup of salted butter (1 stick, for mashed potato layer)
2/3 cup of flour
2-3  cups water
2 1/2 tbps Season All
1 tbsp. approx granulated Beef Boullion

1 tsp. Onion Powder
1 tsp. Salt
pepper to taste
approx 3/4 cup milk (for mashed potato layer)

I am going to include pictures to illustrate each step:

Peel potatos, rinse and chop. Try to keep the pieces similiar in size. Above shows 1 potato peeled and chopped. Place in pot large enough to fit with extra room. Cover in water and bring to a boil, reduce to simmer. Check after 10 minutes or so. Should be able to insert fork and have it crumble.


While the potatos are boiling, place 2 pounds of hamburger into a big enough skillet. Brown thoroughly. DO NOT DRAIN. The grease is important to make the hamburger gravy.


Once browned add 2/3 cups of flour. Mix all together until it is thick, using medium heat on the stove. Let simmer for 2 minutes


Add 1 cup of water and incorporate. Should still be thick. Add another cup of water and incorporate. In total I use the full 3 cups of water, I like it to be a good gravy consistency. See pic below for reference...


Ok, Now it is time to add all seasonings!

Add:: 2 1/2 tbps. Season All, 1 tbsp, granulated beef boullion, 1 tsp salt, 1 tsp onion powder, and pepper to your preference, we use quite a bit as my husband loves pepper. If you like things a little blander, try adding half of each ingredient and go from there.

Stir it all up and place into an UNGREASED 9x13 inch glass container.I use a spatula to spread out.   see below


By now your potatos should be done. Drain and place back in pan and mash with potato masher. Add 1 stick of butter and 3/4 cup milk, a little at a time using just enough so they are smooth. DO NOT USE A MIXER ON MASHED POTATOES. It breaks down the glutin in the potatos and makes it glue like. not yummy. Add salt and pepper to taste.


Next open and drain your can of corn. Spread out on top of your hamburger gravy using spatula to get even.


Next spread out the potatos with spatula.

 
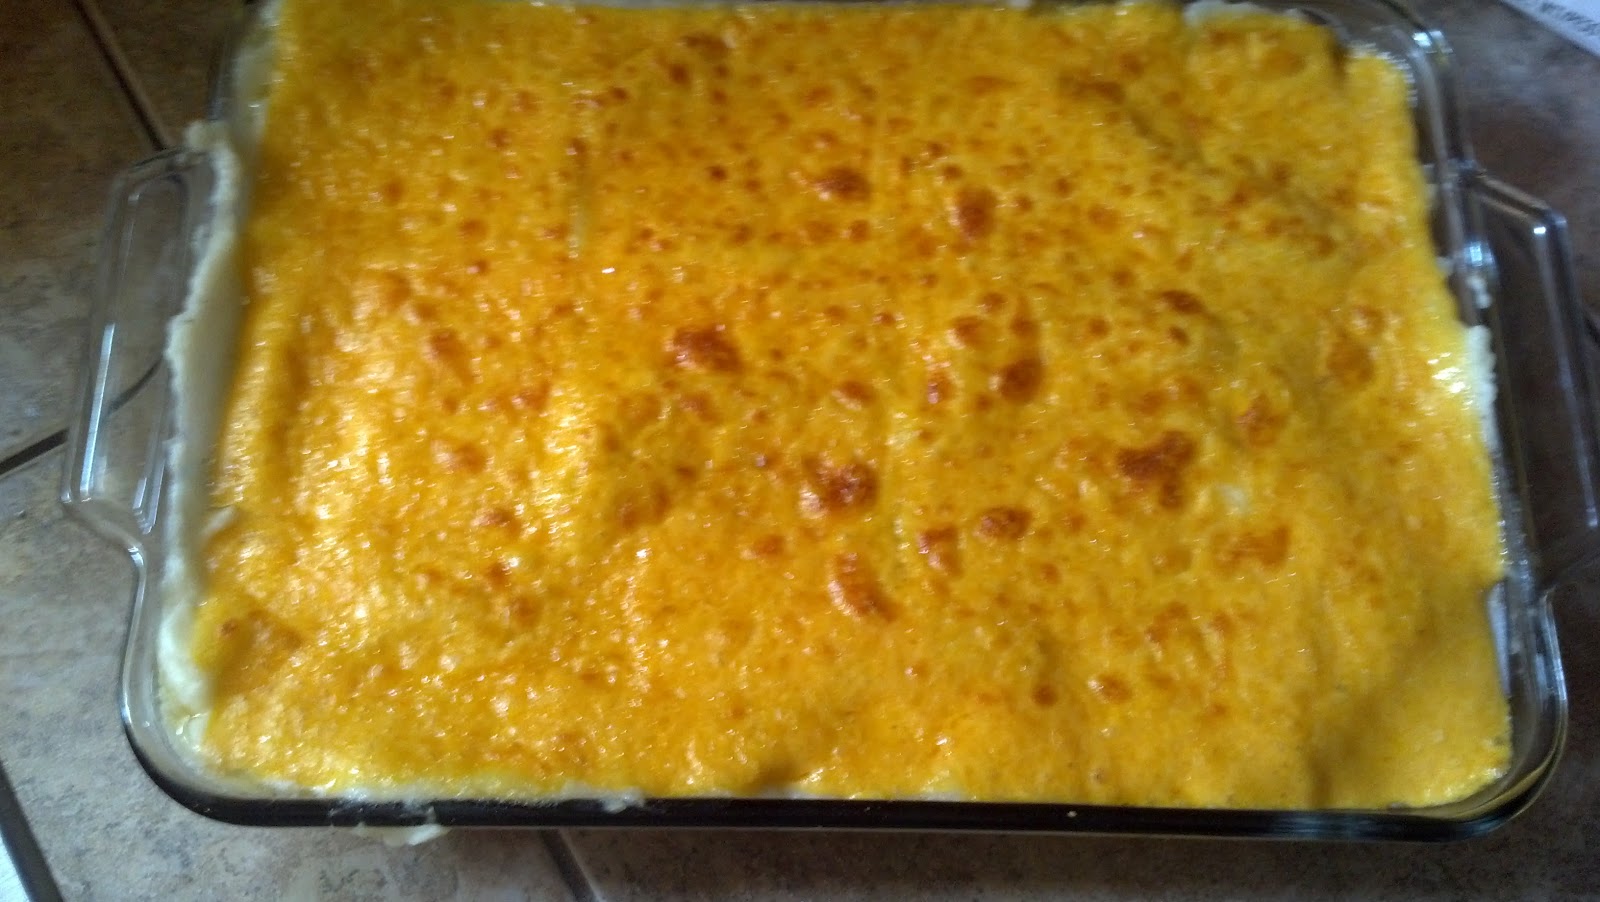
Cover with slices of sharp cheese


Turn on your oven's broiler to High setting. VERY IMPORTANT.... when you broil it will go very quickly. after only 1 minute check it. Continue to check every minute. You want all of the cheese melted and a little browned on top. This is mine after 4 minutes....


Pull out of oven and let cool down for 5 minutes. Using a spatula serve it up! Enjoy with a side salad, rolls etc! Very filling. Bon Appetite!


Other ideas! This hamburger gravy recipe is my lovely mother's and we have been enjoying it ever since I can remember! We like it on top of mashed potatos, and I like it on top of white rice as well. It is nice and easy on the stomach and very filling!


Monday, June 25, 2012

Simply Delicious Creamsicle Popsicle or Smoothie!

Creamsicle Smoothies and Popsicle Recipe


I just love creamsicles and with the increasing temperatures I decided to make my daughters' a nice creamsicle smoothie and some popsicles for tomorrow.

Here is what you need


Orange Juice
Pure Vanilla
Heavy Whipping Cream
White Sugar
12 cubes ice (only for smoothie)

Directions for smoothie:

Measure out 2 cups Orange Juice, 1/4 cup heavy whipping cream, 1/8 tsp vanilla, 2 tbsp sugar.
If you are making a smoothie also add the ice.
Add all into blender.

For popsicles:

Mix all in a blender just as stated above (no ice cubes) just blend for a little in a blender so mixed well. Pour into popsicle molds. We use the little rocket molds. Will yield approx. 6 popsicles depending on mold size. Freeze 6 hours or overnight and enjoy!


Friday, June 22, 2012

Nice Accent Painting.. Easy to do!


I love to paint and I won't buy painting when I can make them myself. I mean.. why would you?
This was very easy to do. I drew the squares on with a ruler. I picked colors that went with our color choices (these are all the colors we thought of painting our kitchen in our new home).

Once it was dried I took superglue and glued tiles that you can find at Home Depot or Lowes. I also used the clear stones that can be found in any craft store. I used a big canvas and here ya go.

Kitty Ears Head Band

To make a Kitty Ears head band you need the following items and supplies


Head Bands
Hot Glue Gun and Glue Stick
Ribbon about 1/2 inch width and 12 inches long
Felt in the color you want ears
Scissors


Step 1: Cut out ear shape, start by folding felt in half, the fold will wrap around headband.


The fold is located on the bottom in this picture. You can do them small like on the left or larger ears depending on what you want on the right.

Step 2: Lay ears out flat and opened. Place headband. Glue one side and press the ear together.


Step 3: Make a small bow. Make sure to treat ends of ribbon so they do not fray.


Step 4: On the right "ear" place hot glue. Stick bow on and hold and...


Voila!!


Kitty Ears Head band.. perfect for a little girl or party favors!


Dried Frizzy Hair? This definately will help


I was born with naturally very curly hair. Over the years, 1 bad haircut and dying my hair one every 6 weeks since I was 18 (now 28).. from black to blonde and every shade inbetween... To say it has taken its toll on my hair is to say the very least. I got a haircut when I was a Senior in Highschool and lost my gorgeous curls.. yes that DOES happen. My hair has to be washed, i have to do a blow out and then straighten it and curl the ends just to have hair that is manageable. I was my hair every other day which is what is the best to not over dry yours hair.

I was in Sally's Beauty and I had a minute and decided to look around. I saw this and was intrigued. I have read about products like this and thought I would try it out.

I wash my hair with my normal shampoo. Then I towel dry my hair and lather this reconstructor in. I pile my hair on top of my head and let it set for 10-15 minutes. Then I wash with luke warm water. Once rinsed I turn the water on the coldest setting and put my whole head under for about a minute. Cold water seals off the cuticle. I use it every other day.. I am trying to grow my hair out for the first time in years and this helps so split ends are kept to a minimum. Its lightweight... doesn't weigh hair down and no residue is left behind. I use it on myself and my 3 girls... their hair ranges from wavy to pintight curls that you can't even straighten with a CHI


Scarlett with said curls just after her bath and this treatment used.


Wednesday, June 20, 2012

I am an Auntie!


My little brother Tony had his first baby today at noon. His wife delivered the most handsome little baby boy Kasen Anthony, 7 pounds 2 ounces. He is just wonderful! Alicia is doing well and so is Kasen. I am just so happy to have another little nephew, I sure do love babies!

Monday, June 18, 2012

Kiss The Dead by Laurell K. Hamilton, and Anita Blake series review and opinion

As many know I am an avid Laurell K. Hamilton fan. I have read all of the books in both the Anita Blake series and the Meredith Gentry series. I have read each book so many times that I have had to replace each book at least twice due to that much wear and tear. My most recent acquire is the brand new released and top selling book by Laurell K. Hamilton, Kiss the Dead. I got it a few days ago and am almost done with my second read through. I like to really read books before I give my opinion on said book. I have to say while it isn't my favorite book, it definitely was worth the wait for it to come out. I have really followed the flow of each character. My favorite progression is Anita of course. She goes from this no nonsense, in control, still learning her power heroine to a heroine that is entertaining, finds what and who she is and no matter what is thrown at her, she bounces back much stronger in body and mind. People blog and complain about the little mistakes found in the Anita Blake series, however you will not find that on this blog. I actual like how it is written like you are listening to your friend talk. I love knowing that Laurell takes the time to research and fact find for knowledge sake and imparts it to her readers. She has set up an alternative world that she has made complete and whole. I never will understand how this series has not been made into a series, or movies. Yes. much of it is XXX rated. however with the right people producing it, and with the correct age appropriate audience, it would blow all vampire based shoes currently on TV out of the water and leave people begging for more. It would become a series that you talk to your friends at work the next day.

There are two types of Laurell K. Hamilton. The die hard fans that have stuck with it since the beginning and still loves every book. The other were so in love with the first few books then as they progressed to more what some say more like "erotica" then they still read but stated that they didn't and just critiqued it. I am not the latter. I have enjoyed all novels on their own. I appreciate when she switches direction here and there with a novel of Edward, Bernardo and Olaf.  It keeps it entertaining and different. I like the the new racy scenes with Anita and her men. It all ties back to the progression of Anita Blake and her rise to who she becomes. Laurell K. Hamilton if you can't tell is who I admire as a writer. Her voice and her point of view is solid and doesn't waiver.

Whether your a die hard fan or only a fan of some of her novels... we all agree that the idea behind the Anita Blake series was incredibly creative and well thought out and planned.

Lisa
Having three beautiful little girls is wonderful. Summer vacations are entertaining and I love to try to come up with new ways to keep them busy. Movie day is a day we try to do whenever we can. The girls and I throw on our favorite pjs and they get to pick their favorite different movies. We usually chat and do little mini make overs.. maybe color some pictures. We are on a mission this summer to try to explore and learn more. We have been trying out a new activity at least every two days and so far they have really enjoyed themselves. Next I am planning on doing a scavanger hunt around our home so they have to explore, follow clues and have a good time outdoors. I am going to write a story about a bunny, and we have to follow the clues along the way.

Gift Idea- Kraft Blok


Neat idea! I saw Kraft Bloks and got so many ideas just looking at them. They are glass blocks that come in a variety of sizes. I thought of using them in different ways and they can be found at most craft stores. I tried a few different things, having bought 3. This is the medium block. I used Aleene's craft glue and placed it on the bottom. I found "grass" in the models section of the craft store. With long tweezers I the placed the grass. I found cute little paper flowers and added a little craft glue and put on the grass. I used Modge Podge and found pictures of my daughters. Placing a little of the modge podge on the front of the pictures with a little sponge brush. Then placed the pictures on the back of the glass. Once done I put a thin layer of modge podge over the back of the glass to seal all of the pictures in. 3D stickers complete the look.


This is a picture of one I made for my father in law. I used play dough for the river.. bought the fishing gear in the miniature section and the grass is in the model section. I bought sky scrapbook paper and used modge podge to glue onto the back of the blok... 3d stickers complete the project.


The one above is the one I made for my mother in law. I developed different pictures of all her "rally babies" grandkids. I placed the "grass" I purchased in the Models section of the craft store.  I glued it down. I then glued the two pictures to the inside of the back. I then glued the kids each to a straw shortened down. I put glue on the open end of the straw and placed down into the grass. I purchased foam fingers and other stickers for the outside. I found a mini bat, ball and glove inside. On the back of the blok I placed modge podge onto the glass, placed the baseball scrap page down and put more modge podge on the back. 


I am going to do an Alice In Wonderland inspired one next. Again with grass, I will make a tree to put in one corner. I am doing a picture of my eldest daughter who is 9 sitting down reading a book. My daughter Ashley will be Alice and my 2 year old Scarlett will be the White Rabbit. Will also do a little dark hole out of black felt maybe.